Creating your First Tree
Table of Contents:
Renaming the "Default" Tree
Modify the Default Tree
Create the first person in the tree
Update the Ancestor Profile
Update the ancestor profile information
Start Building your Tree
importing a GEDCOM file
-
Renaming the "Default" Tree
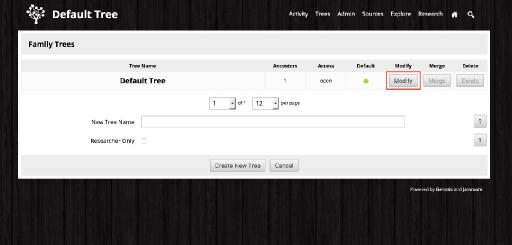
When Genosis has just been installed, it will be be installed with a single family tree called "Default". Our first step is we are going to rename the default family tree to something more appropriate for your family.
To rename the Default family tree, click on the "Trees" option in the Top Menu, and in the drop down list choose "Tree Browser".
This will take you to the Tree Browser tool where you can see all family trees that are configured in your Genosis.
Click on the "Modify" button to the right of the Default Tree. -
Modify the Default Tree
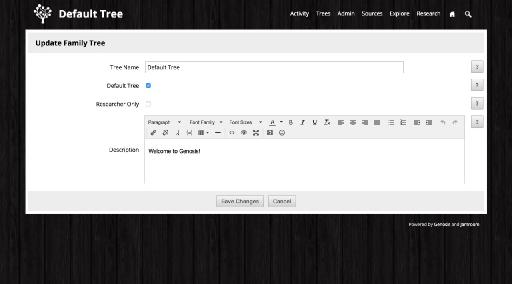
You should now be in the "Modify Tree" form for the Default Tree. On this form you can change a few things:
Tree Name - This is the name of the tree. Change this to something more suitable for your family - i.e. "The Johnson Family Tree"
Default Tree - If this option is CHECKED it means that this tree will be the family tree that is shown to users when they first visit the site - i.e. it will be the "default" tree.
Researcher Only - If this option is checked, this tree will be hidden from everyone that is not a "Researcher".
Description - If a description is entered it will be show at the top if the site index page.
Once you have modified the Tree settings to suit your needs, save the changes. -
Create the first person in the tree
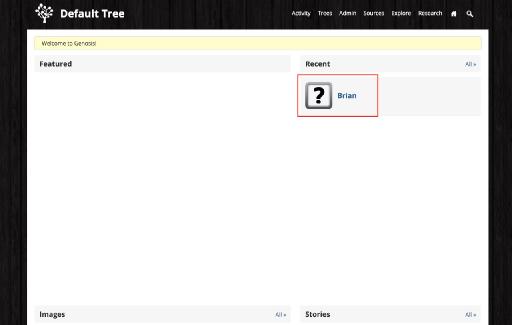
Whenever a NEW tree is created in Genosis, a single person is added to that tree. When you first installed Genosis, a single person was added. This is your "starting point" for your new tree. This can be yourself or an ancestor you wish to begin your work on.
If you are not on the site index, click the large Tree Name or icon in the upper left of the screen to go back to the home page of your Genosis install. You should see ONE person listed under "Recent".
Click on the person under recent and you will be taken to their ancestor profile. -
Update the Ancestor Profile
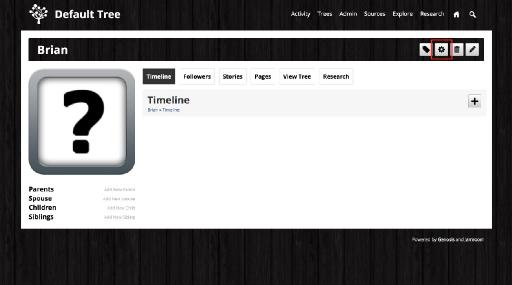
Now that you are viewing the FIRST ancestor profile in the tree, click on the gear icon in the profile header.
This will take you into the Modify Profile screen where you can update the settings for this profile. -
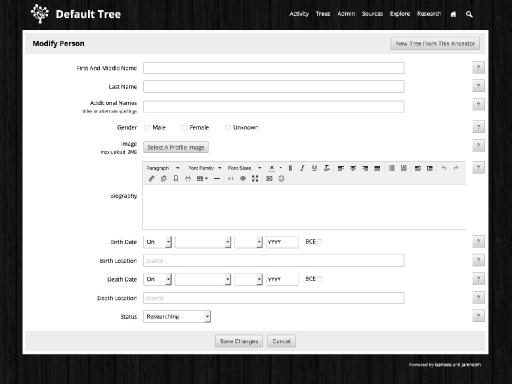
Update the ancestor profile information
For now, enter the first and last name for the ancestor, and optionally upload an image for them. If you know the birth and/or death dates, enter those as well.
Feel free to enter what information about this profile you would like.
When finished, press the "Save Changes" button and you will be directed back to the profile timeline. -
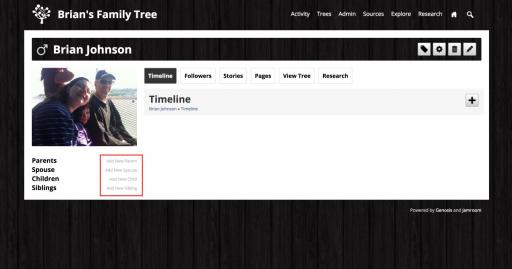
Start Building your Tree
Once you are back on the Ancestor Profile, you can now begin to expand your tree by adding parents, spouses, siblings and children.
To add a new person to the tree simply click on the "Add New" option in the Ancestor Profile menu. You can add as many linked profiles as you would like - Genosis is very flexible for families of all types, and does not enforce any family setup or style. -
If you already have your family tree in a GEDCOM file, you can import that directly, continue reading on the next page:
importing a GEDCOM file
Importing a GEDCOM file