Redis Cache
Table of Contents:
Overview
Requirement: php-redis PHP module
Redis Cache - Global Config
Redis Cache - Server Browser
Enable Redis as the Active Data Cache
Optional - But Recommended - Enable Redis User Sessions
-
The Redis Cache module adds support for using Redis as a Core Data Cache and User Session server (instead of the MySQL server). On large systems this can speed up caching and free up MySQL from serving cache and session requests.
Overview
Requires that Redis is installed and configured on the server:
https://redis.io
You can download and install the Redis Cache module from the Jamroom Marketplace. -
If you get a PHP fatal error like this after installing the Redis module in your Jamroom:
Requirement: php-redis PHP module
PHP Fatal error: Uncaught Error: Class 'Redis' not found in /home/dev/public_html/modules/jrRedis/index.php:443 [1]
thrown in /home/dev/public_html/modules/jrRedis/index.php on line 443
This means the required PHP Redis module is not installed. If you have shell access to your server and are running Ubuntu, you can install the php-redis module with the following command:
Quote:
sudo apt-get install php-redis
If you do NOT have shell access to your server, contact your hosting provider for assistance enabling the php-redis PHP module.
-
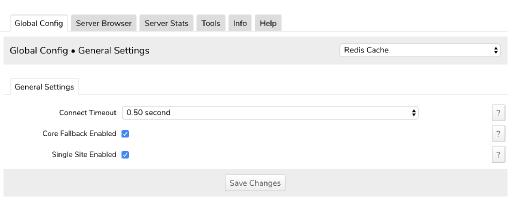
Redis Cache - Global Config
After installing and activating the Redis Module, there are a few Global Config options you will want to check out:
Connect Timeout - This is the number of seconds Jamroom will wait to connect to the configured Redis Server.
Core Fallback Enabled - If this option is enabled, and the Redis server is unreachable, Jamroom will "fall back" to use the MySQL server for caching and/or user sessions.
Single Site Enabled - If you only have ONE Jamroom site on the server using Redis, make sure this is ENABLED. If you have multiple Jamroom installs all using the same Redis server, this must be UNCHECKED. With this option unchecked, clearing the entire site cache the Reset Caches form will be slower. -
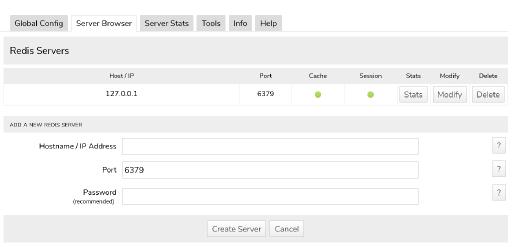
Redis Cache - Server Browser
Once the Redis Cache module is enabled, you will need to create your first Redis Server. Click on the Server Browser tab, and in the "add a new redis server" section you can enter the connection details for the Redis Server:
Hostname / IP Address - Enter the IP address or fully qualified host for the Redis Server. If Redis is running on the same server your Jamroom site is running on, this is usually set to 127.0.0.1
Port - Enter the port the Redis server is running - this is usually the default 6739
Password - If your Redis Server is password protected, enter the password here. Note that if your Redis server is only listening on the localhost (127.0.0.1) then you likely are not using a password and this option can be left blank. -
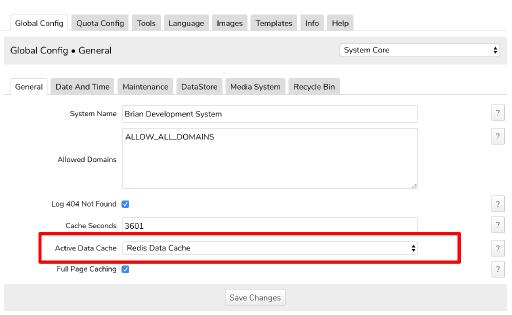
Enable Redis as the Active Data Cache
The last step is to ensure Redis has been selected as the Active Data Cache in the Core -> Global Config. Select "Redis Data Cache" and save. -
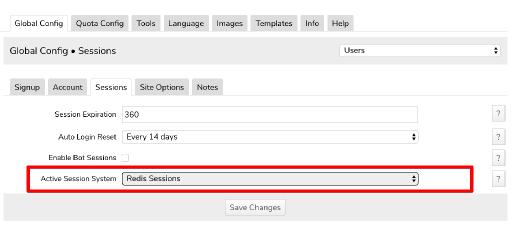
Optional - But Recommended - Enable Redis User Sessions
The Redis Cache module also supports offloading User Sessions from the MySQL server. This can be helpful on large Jamroom sites. To enable Redis for User Sessions, go to the ACP -> Users -> Global Config -> Sessions tab and select "Redis Sessions" for the Active Session System setting and save.
NOTE: If you are using the Jamroom Analytics module it is highly recommended to use Redis for user sessions - you will see more information about your online users if you do so.