Step 4 - Importing the Ning Archive to Jamroom
Table of Contents:
Preparing for the import
Importing all Ning Members, Media and Items
Media File Conversion
Ning Signup Questions
Sending the New Passwords to your Members
Important Advice about Mass Emailing
The Uploaded Ning Archive
-
The Jamroom Core comes with a set of modules to provide basic CMS functionality. To import your Ning archive you are very likely to need some additional modules installing in order to receive Ning content.
Preparing for the import
The following lists the additional Jamroom modules that will likely be needed (and which can be installed from the Jamroom Marketplace: ACP -> Core -> Marketplace):
Audio
Any uploaded Ning audio items (mp3s, wmas etc.) are imported to the jrAudio module.
Video
Any uploaded Ning video items (flvs, mp4s etc.) are imported to the jrVideo module.
YouTube
The Ning video archive may also contain embedded YouTube items which if found, are imported to the jrYouTube module.
Image Galleries
Any uploaded Ning photo items (jpgs, gifs etc.) are imported to the jrGallery module.
Events
Any Ning events (gigs, concerts etc.) are imported to the jrEvent module.
Groups
Any Ning groups are imported to the jrGroup module.
Group Discussions
Any Ning group discussions are imported to the jrGroupDiscuss module.
Group Pages
Any Ning pages are imported to the jrGroupPage module.
Forum
Any Ning discussions that are not associated with a group are imported to the jrForum module.
Ning Memo
Any Ning notes are imported to the jrNingMemo module.
Comments
Any Ning comments, on any of the above items, are imported to the jrComment module. All Ning items, including members, can be commented on, so the installation of this module is pretty essential.
You want to assess what is in your Ning archive and decide which of the above Jamroom modules you need to install.
From your Jamroom site's Admin Control Panel (ACP) click on Core, then Marketplace in order to view and install the required modules.
If you are using our hosting, all of the above modules (and more) are freely available and can be installed with a single click via the Jamroom Marketplace, accessible in your site's control panel. If you are running Jamroom on your own hosting, the required modules are still available via the Marketplace but will need purchasing first.
Once installed, Jamroom modules need to be enabled and have their Global Config and Quota Config setup.
-
Ning Members are imported to the Jamroom Profile and User modules. These, along with the Blog module are part of the free Jamroom Core.
-
Next, install the Ning Import module - this is the module that does the actual work of importing your Ning Archive. You can get it for free from the Jamroom Marketplace.
One more thing to optionally do to complete the Ning import preparation - create a profile quota for the imported Ning members. While this is not essential, it is recommended so that all imported members are in one place, away from admin and any other Jamroom site profiles.
In the ACP, click on Profiles, then User Profiles. Open the Tools tab then click on Quota Browser. You need to create a new quota by either entering a new quota new in the field below the table, or by cloning an existing quota. The latter is preferable as the new quota will take on the attributes of the cloned quota and all the installed modules will be enabled for the new quota (assuming you did that when they were installed).
After creating the new quota, click on Core, then System Core, then Tools, then Integrity Check. Leave the options as default and run the check. This will make sure that the new quota is 'known' by the system and all the modules. -
When you've done all of the above preparation, you are ready to do the actual import of your uploaded Ning archive.
Importing all Ning Members, Media and Items
-
In your Jamroom site's ACP, click on Tools, then Ning Import.
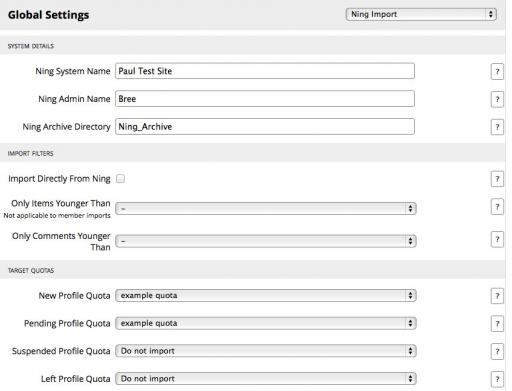
Go to the Global tab of the Ning Import module and see a page like this on the right.
The help buttons on the right of the page will guide you as to what each field needs, but basically, enter the name of your Ning Site, the name of the Ning Admin, the name of the folder where you uploaded the Ning archive to and select the quotas for your imported Ning members.
The Site Forum Profile ID can likely be left at 1 (the Jamroom Admin account) as this is the owner of the forum or group into which global Ning discussions will be imported to. By default, global Ning discussions are imported to the Jamroom Forum module. However, they may alternatively be imported to a specified group. If you want this option, enter the name of the group in the Site Forum Group field.
Finally, select the desired Gallery Import Option (click the help button for more information on this).
Save the changes. -
Forum, Group or Discussion??
The above asks you to select either a forum, group or discussion for your global Ning discussions. The difference between them is the destination Jamroom module. Forum is recommended as that is a fully featured forum module. Alternatively, Groups can be defined as the forum categories, then group discussions under them would be the forum topics. There is a third option using the Jamroom Discussions module. This is a 'halfway house' and is a partially featured forum. Groups and Discussions support 'threaded comments' so if this is important to you, select one of them. Otherwise pick the Forum option. -
Now click on the 'Import Ning Archive' tab. This is it - we are actually now going to do some importing!!
You will see an option to import all Ning members. It is most important to do this first. All Ning (and Jamroom) items are 'owned' by members so if members are not imported first, any attempt to import other items will fail.
Select the 'Create Only' option and click the 'Import' button. A modal window will open and the import progress will be displayed. This is where you can keep an eye on how things are going!!
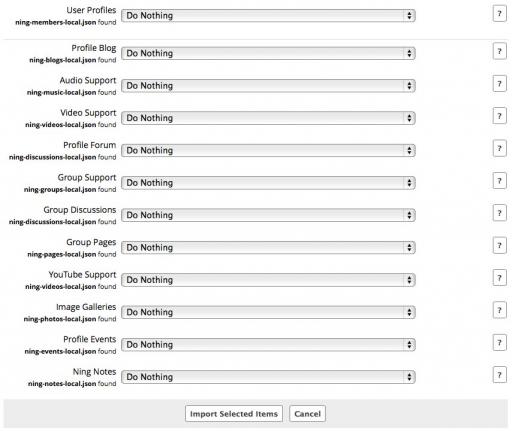
When that is complete, the page will change to show options for all other Ning item imports (see screenshot left). At this point, we could just select 'Create' for all items, click the Import button, cross ones fingers, go away, make a cup of tea and hope for the best, but I like to do imports one set of items at a time. That way I can keep an eye on its progress, make a note of any problems or errors that come up (hopefully none but you never know) and generally gain some confidence that all is going well.
-
Ning item imports are not instant. They can take several minutes, or longer, each, dependant upon how many items there are. Use the modal window to check import progress and to look out for any errors.
-
You hopefully now have all Ning items and content imported, so take a look at the Jamroom site's index pages and see a load of familiar looking Ning members, their uploaded media, blogs, groups etc. (Note that you might need to open the skin settings page (ACP=>Skin Settings) to set your members quota correctly first).
Media File Conversion
Any imported audio and video items now need to be converted.
-
Jamroom converts all uploaded audio/video items into mp3/flv format so that they will play on its html5 players on any device (desktops, tablets and mobiles). In doing so, it will also convert them to the site standard bitrate (selectable in the modules' global settings). The original file will remain intact and if downloads are allowed or the item is sold, it is that file that will be made available for download. If the file is for sale, conversion will also produce a sample file of shorter length for preview purposes. If the item is a video, an image will be grabbed from it for display alongside the video item.
-
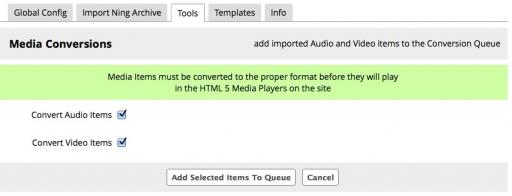
Go to the Import module's Tools tab then click on 'Convert Media' button.
Select both audio and video and hit the button.
A modal window will show the media files being added to the 'Conversion Queue'.
This is a background task for your server and it will quietly get on with the job whilst you move on to the next stage.
-
Media conversion is very server intensive and while a conversion is in progress you may notice a sluggish response time when viewing site pages.
You can check the conversion progress at any time by clicking on Dashboard => Queue Viewer.
If you are using Jamroom Hosted, all media conversions are done on an external dedicated Conversion Cluster - this removes the load from your server and also does the job a lot quicker.
-
One of the features of Ning sites is the ability to define a set of 'signup questions' that are answered when members signup. These questions, and the member responses to them have also been imported to your Jamroom site. We now need to configure your Jamroom site in order to show them.
Ning Signup Questions
To do this, we take advantage of one of Jamroom's more powerful site development tools, the Form Designer.
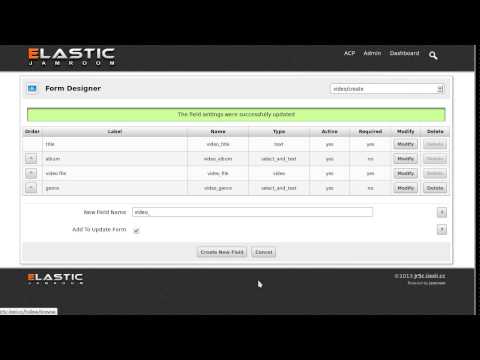
To understand what the Form Designer does, first watch this video.
-
-
OK - So you now see that the Form Designer can be used to add to and modify the fields of any form used on a Jamroom site. We are going to use it to add your Ning signup questions to the Jamroom 'signup/registration' form and the 'update user account' form so that the logged in users can modify their answers post signing up, should they need to.
-
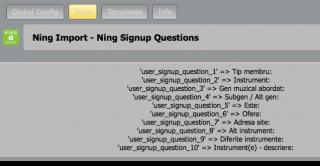
First of all, we need to remind ourselves of what our Ning signup questions were. In the ACP click on Tools, then Ning Imports, Tools, then Review Signup Questions and see something like the image on the left. The texts to the left of each line is the name of the field we are going to add to the signup and update forms, and the texts to the right of each line are the signup questions you defined on your Ning site. I suggest you keep this browser tab open so that you can easily copy and paste these text strings into the Form Designer. So now, open another browser tab and go to your Jamroom site in that.
-
We'll do the user update form first. Log into you Jamroom site as admin or go to your profile page if you are already logged in. There should be a little cog wheel showing, usually top right of the page. Click on it to go to your profile update pages. Now click on the Account tab, then the Form Designer button, again top right.
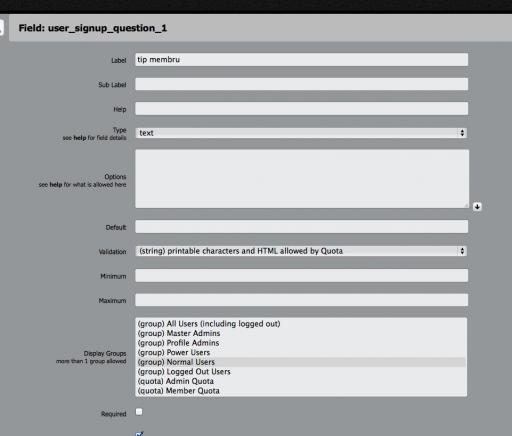
Remembering what you have just seen in the video, copy (from the other browser tab) and paste 'user_signup_question_1' into the field at the bottom of the page and click on Create New Field. You should now see something like the image on the right.
Copy and paste the question into the Label field, optionally add in a subfield and any help text that would clarify the question more, select the field type dependent upon the type of answer you expect, leave the 'display group' at the default Normal Users, if an answer is required before signups are allowed, check the Required box, then check the Active box and hit Save.
Do the same for all other questions by creating fields 'user_signup_question_2/3/4' etc.
-
To set up the same questions for when a new member is signing up, go to http://YourSite.com/user/signup, click on the Form Designer button there, and repeat the above procedure but this time, set the Display Group to 'All Users including not logged in'.
-
The import of your Ning site to Jamroom is now complete. Please check the site over and satisfy yourself that everything has been imported and all your Ning members, their content and upload media is intact and working.
You might, at this point, want to customise the look and layout of the site by modifying the skin templates and CSS (that's a whole new subject not covered here - checkout the general Jamroom documentation). You may also now want to take advantage of more of Jamroom's features by installing some extra modules for added functionality (checkout the Jamroom Marketplace), but at some point you need to inform all your Ning members that they have a new site and invite them to login and check everything out.
-
Unfortunately, one thing that Ning (rightly) doesn't release in their archives are the original member passwords, so when the members were being imported, Jamroom created new, random passwords for each member.
Sending the New Passwords to your Members
-
Important - Please read
There is a strong likelihood that many of your imported member email addresses will be invalid, as it does not appear Ning has ever "scrubbed" and removed invalid email addresses. People change their email address all the time and often don't maintain or redirect their old ones, meaning that they are undeliverable and will 'bounce' if used.
Many email servers, when detecting many bounces over a short period of time will assume that you are a spamming site and block you, so it is strongly recommended that all your imported user email addresses are validated prior to sending new passwords (or doing any other email communications).
If you are on one of our Hosted packages you will be using MailGun as your email server and they have an integrated API tool to validate email addresses. Please click on the link below for information on how to set up your MailGun module for this. Do this as soon as you have completed your import so that all emails are validated prior to your 'going live'.
https://www.jamroom.net/the-jamroom-network/documentation/modules/282/mailgun-api
If you are not on one of our Hosted plans, or are not using MailGun, checkout our KickBox module for an alternative method of email validation -
https://www.jamroom.net/the-jamroom-network/documentation/modules/2929/kickbox-email-validation -
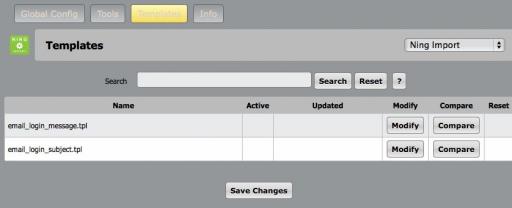
In the ACP click on Tools, Ning Import, then Templates and see something like the image on the left. These are the templates for the email that will be sent to all your members to notify them of the new site and to tell them their new password, and advice on how to change it.
Click on the Modify button next to the 'email_login_message.tpl' template. -
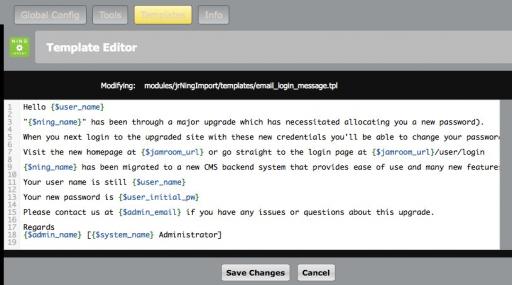
You can now optionally edit the template to whatever you want it to be.
Note the use of 'variables' inside the curly brackets. You can use these where ever you want as well. When the emails are sent, they will be replaced with actual values specific to each member.
{$ning_name} is the Ning site name you set up when configuring the import module above.
{$system_name} is the name of this Jamroom site configured in Core=>System Core=>Global
If you make any changes to this template, be sure to save them by clicking the Save Changes button. Then, on the original template list page, check the box to make the edited template active.
You can now optionally edit the 'email_login_subject.tpl' template which is the subject line of the the email.
-
You have now been introduced to another powerful feature of Jamroom - template editing.
As you look around the ACP you'll notice that all skins and modules that generate page content have this feature so from within the ACP, admin can quickly and easily change the look and layout of his Jamroom site (a basic knowledge of html will be required).
You may also notice that all skins and modules also have a Language tab. Here you can edit the fixed text strings used in the templates, or even convert the site from English to another language. See https://www.jamroom.net/the-jamroom-network/documentation/development/541/translate-jamroom-into-another-language for more information about this.
-
You are now happy with the content of the email that is going to be sent to all your members, so go back to the Tools tab and click on the Send Passwords button. If you are sure that you and your new Jamroom site is ready, click the Send button.
Note that emails are only sent to members that have not already logged into your new site, so you could optionally use this tool again after a few days, say, by changing the template to be more of a reminder and sending it again to those members who might need a bit of prompting to login!
-
If you have many users, emailing them all at once may be construed as 'spamming' by your hosting provider and at worse, they might shut your site down. Consult your hosting provider's mass emailing policy to assess this risk.
For this reason, Jamroom queue emails and sends them as a background task at a set maximum rate per minute. See your email module configuration options to set the maximum rate.
-
As well as all the Ning member audio, video and image files that have now been imported to Jamroom, the Ning archive also contains media files (images) that are referenced in imported text descriptions and comments. During the import these referenced files are copied to the data/media/0/0/Ning_Media folder and the links in the text changed accordingly.
The Uploaded Ning Archive
If you are happy that the import was successful, and if you need to save server disk space, it is now OK to delete the originally uploaded Ning_Archive folder.