Creating Email Aliases - receiving email at your domain
Table of Contents:
Creating Email aliases to accept Email at your domain
Accessing the Email Aliases Tool
Creating a new Email Alias
-
If you would like to receive email for your domain (i.e. "support@yourdomain.com"), then you will need to configure the email addresses you want to receive email at as Email Aliases.
Creating Email aliases to accept Email at your domain
Once an email alias is created, any email that is sent to that email address will be forwarded to the email address it has been aliased to. -
Jamroom Hosting does NOT host any mailboxes or run a POP3 or IMAP mail server - the only way to receive email at your domain is by creating an Email Alias!
-
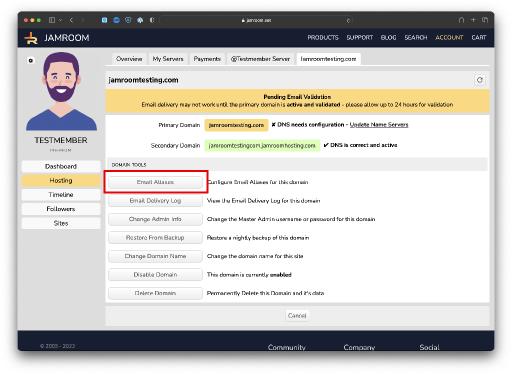
Accessing the Email Aliases Tool
The first step is to view the Email Aliases configured for your domain - you can get to this section by click on the "Settings" button for the domain you want to view the Email aliases for.
The "settings" button is found to the right of the Domain list when viewing your Hosting Server. -
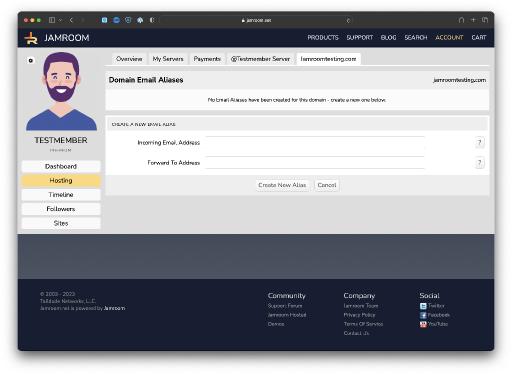
Creating a new Email Alias
Once you have clicked on the "Configure Email Aliases for your domain" button, you will see the Domain Email Aliases tool. This simple form allows you to create NEW email aliases for the domain.
An Email Alias is simply a way to forward email that comes in for one email address to another email address. Since on Jamroom Hosting we do not run any mailboxes, in order to receive email you must forward any email that comes in for an address to an existing email address.
For example - if we were to setup the following Email Alias:
Email Address - support@yourdomain.com
Forward Address - you@gmail.com
Then whenever someone sent an email to support@yourdomain.com, you would receive it in your Gmail account at you@gmail.com.
You can configure as many different email aliases as you would like - just make sure the Forward Address is a REAL email mailbox where email can be received.